Web portal documentation
Welcome! Here we explain to you the basics of our product configurator’s web portal – how to register and log in, how the main screens are built up and what you have to do to set up and embed your tailor-made product configuration system for your individual product. You will read about our basic ideas that make up this web service and how our simple but quite practical illustrative example – the awning – works.
If you have an account, we also offer you some basic support to get your configuration system up and running. Though we strongly suggest to carefully read this documentation first, feel free to contact us – and enjoy!
Please also check out:
A brief introduction – About us
Registration
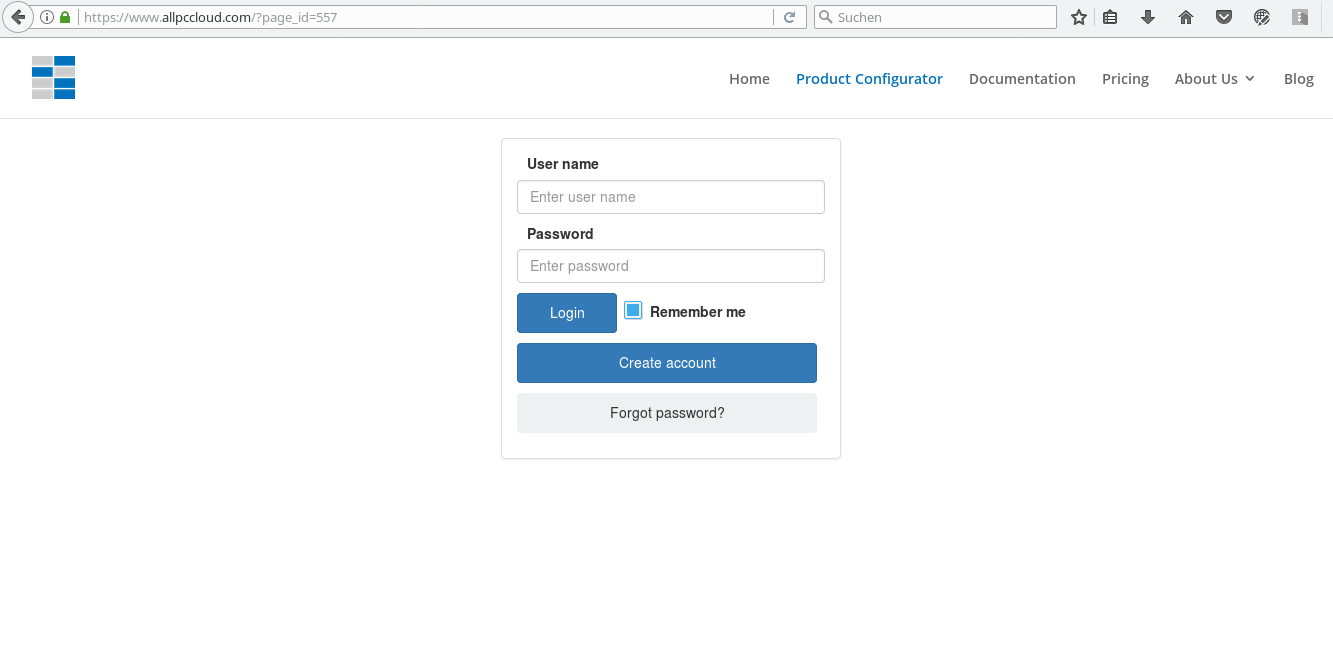
Go to www.allpccloud.com and click the “Product Configurator” page to see the login screen. Here you can create a new account. You will need a valid E-Mail address to activate your account. During the registration process your individual software service contract is displayed which you should read and store carefully. You must explicitly agree to this contract and to the GTCs to register successfully.
Main screen
After login you see the portal main screen.
![]()
The black bar at the top is the navigation bar where the main screen can be switched and where the application menu is located on the right hand side.
The main screen is split into a left and a right hand side. On the left hand side you see a (now empty) list of kernels (aka transactions) which are available and/or running. Kernels are the instances where product data is actually stored; each time such data is handled a running kernel is involved. You can create a new kernel here, you can start them or stop them. On the server this means a new kernel process is started or stopped. The kernels write data to the underlying data base that is read in when an available kernel is started again. We will take a closer look at kernels later on.
On the right hand side of the main screen you see the plugin list (which is now empty too). The plugins define the behaviour of the configuration wizard. From the set of available plugins you can set up the sequence of elementary steps a shopper must run through during the configuration process. For this you can add a plugin from the available list, or a plugin which is already included in the sequence can be copied, moved up/down or deleted. The detailed definition of its behaviour is done with the administrate button and a written description can be added too.
With the checkbox “maintenance mode” you can toggle the maintenance flag in your configurator – that means if you are not yet done with the setup or you have to do modifications in your setup you can switch on the maintenance mode so the shopper view only shows a construction image.
Working with kernels
Kernels are containers for product data. A kernel holds the product tree which is the data basis of the configuration process. A new kernel is created and started with the “Start kernel” button. The new kernel will be shown in the kernel list.
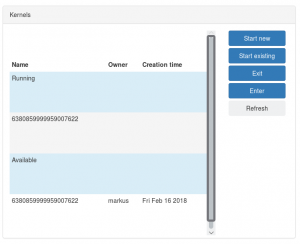
To work with a running kernel, select it from the “Running” list (left mouse click) and press the “Enter” button. The result can be seen in the navigation bar.
![]()
Once you are logged in into a running kernel you can also switch to the next portal page, the product tree. When a kernel is not needed any more you can stop it (“Exit” button) but a kernel is stopped automatically after 10 hours of inactivity anyway.
The product tree
When logged in to a running kernel you can go to the product tree page using the navigation bar. Click on “Product tree” to see this next page.
![]()
The product tree is needed for a detailed description of the product you want to make available for the configuration. The basic approach is that a complete product is assembled/composed of more elementary sub products. When you have broken down your product to the semi-finished parts or purchased parts in such a structured way the result is the product tree.
A good product tree structure is very important for the configuration process! Notice that you have many benefits from such a structure: You can review all sub parts of your product here. The product tree is needed to create bills of materials and to compute, among others, purchasing prices from the net prices of the elementary sub products. When an order is generated by a shopper the products at the basic level, aka the root products, are listed in the order document.
The product tree is shown on the left hand side of the screen (now empty) in a hierarchical form. On the right hand side the various (elementary) products are shown in a linear list. In the center there are the control buttons for manipulating the product tree, i.e. to created/copy/delete products, assemble them to other products or administrate their revisions. Most important you can edit the product attributes (button “Attributes”) that describe a product on an elementary level.
Creating a product tree
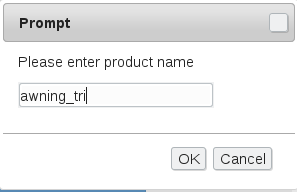
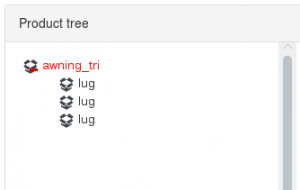
We now want to illustrate how the product tree of the simple awning demo (see here) is made up. Press the “Create” button to create a product for a triangular awning (product name: awning_tri) and a lug. The result is seen in the images below.
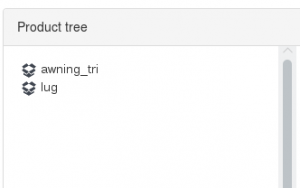
The products are also visible in the linear list in the right hand side of the screen. To assemble three lugs into the awning, select the awning (left mouse button) in the product tree on the left hand side, the lug in the linear list on the right hand side and press the assemble button three times. Expand the awning in the product tree (green + symbol) and get this result:
To store this very basic product tree in the data base press the “Push” button and confirm in the dialog that shows up.
To store this product tree as a template for later configuration processes select awning_tri and press “Save template”. We likewise do this for a rectangular awning since the shopper later has the choice between a triangular and a rectangular awning.
Product attributes
Each basic product must have attributes to be useful. To define attributes select the product (either in the tree or in the linear list) and click the “Attributes” button or the “Product attributes” item in the navigation bar when it is available. An empty attribute list screen should be shown now.
![]()
An awning should certainly contain attributes for its size (width and height) or its color. These can be created here (“Create” button). You can also assign default values. In our case this is the complete list of attributes that is needed for awning_tri:
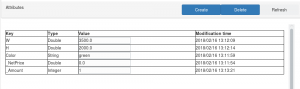
Note that attribute names are arbitrary but _NetPrice and _Amount have special meanings for the purchase process later on.
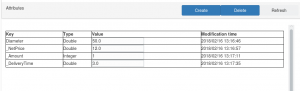
For the lug the attribute list looks like this:
Do not forget to go back to the “Product tree” screen (navigation bar) and press the “Push” button to store the attributes to the data base! Also recognize that this will increment the version number of the product. Modified products that are not yet stored are highlighted with red text color in the product tree. Also do not forget to save awning_tri and awning_rect as templates!
Labels and data versioning
Since a product description can grow and vary or new products can be included into the configuration it is quite important to keep track of the changes products have undergone. This is subject of data versioning on the “Product tree” screen.
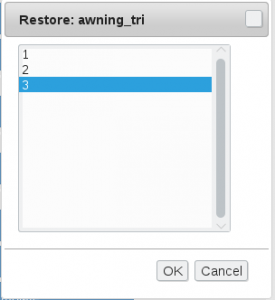
We have already see that new product versions are created when the “Push” button is pressed and a product has been modified. To restore older versions of a single product use the “Restore” button and select an available version:
You can also recover deleted products (“Recover” button) under the condition that a version has been stored at an earlier stage. By the way: When you do modifications in your product tree, you can press the “Discard” buttons to discard all these modifications and go back to the version that has been pushed last.
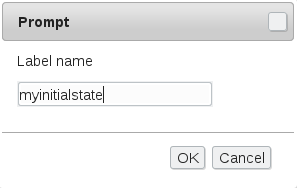
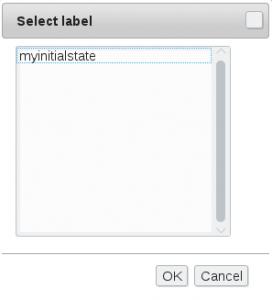
In many cases it does not make too much sense to restore or recover the version of one product only. Often you want to restore the whole product tree of an earlier state. For this purpose, labels are used. You can imagine a label as a snapshot of all product versions in a current state. It is mandatory to assign a name to a label. To store a label use the “Save label” button, to load it again use the “Load label” button. Note: The snapshot refers to the product tree version that has been pushed at last which is not necessarily the state which is visible on screen – so normally before you save a label, you do a “Push”.
The label mechanism is extensivly used by the plugin sequence in the configuration process. Actually before and after each step of the configuration wizard a label is created automatically – this enables the shopper to arbitrarily move forward and backward in the configuration process. More on this topic later on.
Templates
So far we only worked with one single kernel which is in fact the basis for all product data used in later configurations. When a shopper starts a configuration process a new empty kernel will be started but since kernels are isolated from each other there must be a mechanism to shift the product data we have defined to this empty kernel. This is done by templates. A product that is stored as a template is available to other kernels, and so are its sub products. Note that the version history is not copied: When an empty kernel loads a template product its version number will start with 1 again. Also labels are not shared between two kernels.
You can load and save templates using the corresponding buttons on the “Product tree” screen.
Working with plugins
While kernels store product data and are at the heart of the data side of a configuration process, plugins are responsible for the behaviour and the appearance of the configurator. In our approach product configuration takes place in a step-by-step process, called a sequence or a wizard. A shopper runs through each step of the sequence and sees one screen at a time to make some input. This input is stored in product attributes or makes some template being loaded. When switching to the next step, the new data is pushed and a label is created. Analog to the shopper running through the process, and making more and more input, the product tree is built up incrementally until the final state is reached and the shopper can order the product he or she has configured.
In our example the plugin sequence looks like this:
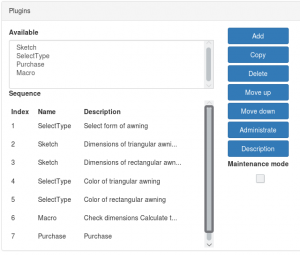
From the list of available plugins a type is selected and appended to the sequence (“Add” button). Currently four basic plugin types are available:
-
Sketch: Input the dimensions of a sketch. You can define a list of product attributes that can be accessed in this step. This does not necessarily mean real number attributes; integer numbers, strings and boolean values are possible as well. The sketch itself is an image that needs to be uploaded (png file). In out example we use this plugin to define the dimensions of our awning.
-
SelectType: With this plugin a selection can be carried out. In our example we use it to enable the shoppers to select a form (triangular/rectangular) and later to select a color. For each selectable item an illustrative image can be uploaded and a caption can be set – as in all plugins multi-lingual text labels are possible to enable quick language switching. It can be defined what happens after selction – for example a template can be loaded or an attribute can be set to a specified value. Also it can be specified which sequence step will be the next depending on the choice made by the shopper.
-
Macro: Here you can upload a BASIC script that is executed when this step is carried out. This is often necessary to check input data, do calculations or make some logical decisions what is the next step in the configuration procedure. In our example the dimensions are checked – only a sensible range is possible, if the shopper has made erroneous input, further progress in the wizard is ruled out -, a net price is computed and some output is generated. A macro must explicitly enable the next step(s) in the configurator wizard. The BASIC script language is documented here.
-
Purchase: Normally in the end of a configuration process this plugin is used. It enables the shopper to finish the configuration process by ordering the final product(s). To do this a final price and a delivery time is calculated (using the special attributes _NetPrice and _DeliveryTime in each product), also for a larger but terminable amount (attribute _Amount). A bill of materials is generated and also an invoice or offering document which is handed to the shopper – for this the plugin also asks for his or her personal data. To do a suitable price calculation values for profit margin and purchase tax can be entered. For formal correctness a link to a GTC (general terms and conditions) page can be set and an invoice/offer document template can be uploaded.
Usually the wizard sequence is not executed strictly linear. In our example depending on the choice of the form of the awning either the Sketch plugin for the triangular or for the rectangular form is invoked whereas the other is omitted. All plugins have the ability to influence such forkings.
The navigation bar menu
The menu in the navigation bar offers you some more administrative but nevertheless important functions you need to operate our web service properly. It can be opened by clicking the top right symbol in the bar:
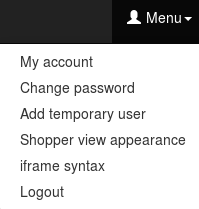
These are the available options:
-
My account: Here you can edit your personal data and also check the current fee balance of your account. This should be quite self-explaining.
-
Change password: When you choose this item a mail will be sent to your E-Mail address that contains a link to a page where you can enter a new password for your account.
-
Add temporary user: Here you can add other users that have access to your configurator portal – e.g. if you have more than one persons in your organisation that are appointed to work with the portal. No additional fee will incur.
- Shopper view appearance: Here you can edit the appearance of the plugins’ shopper views to adjust it to your hosting page. Note that this has no effect on the portal itself but you can preview the results when administrating your plugins.
-
iframe syntax: VERY important! Here you can get the <iframe> syntax needed to include the configurator portal – the view available for the shoppers, your customers – into your web presence. Such an <iframe> tag is a standard html element that can be embedded into virtually any content management system or static html page, very similar to a hyperlink. Your web master should be able to handle such a tag without any problems.
-
Logout: Logout from the portal and go back to the login screen.